Navigating the maze of database connectivity can be daunting, especially when you’re working with popular databases like MySQL and robust development environments like Delphi. But what if there was a streamlined way to bridge the two effortlessly? That’s precisely what this blog post is all about. Leveraging insights from an in-depth tutorial video, we’ve crafted a step-by-step guide to demystify the process. We’ll explore how to use Devart’s MySQL Data Access Components (MyDAC) to seamlessly link your Delphi application with a MySQL database. This guide serves as your roadmap, designed to make MySQL connectivity in Delphi not just possible, but straightforward and efficient.
Table of Contents
Prerequisites
Before diving into the nitty-gritty of MySQL connectivity, it’s essential to ensure you have all the required software and tools at your disposal. Here’s your checklist:
- Delphi: The development environment where you’ll be crafting your application.
- MySQL Database: The database you’ll be connecting to, which should be properly configured and accessible.
- MyDAC by Devart: This is the key component that will facilitate the connection between your Delphi application and the MySQL database.
Armed with these prerequisites, you’ll be well-prepared to make the most of this step-by-step guide to MySQL connectivity in Delphi.
Also Read – How SQL Union Queries Can Make a Difference in Your Business Operations
Installing MyDAC
Getting MyDAC installed on your system is the first crucial step in this journey. Below is a detailed walkthrough to guide you through the download and installation process.
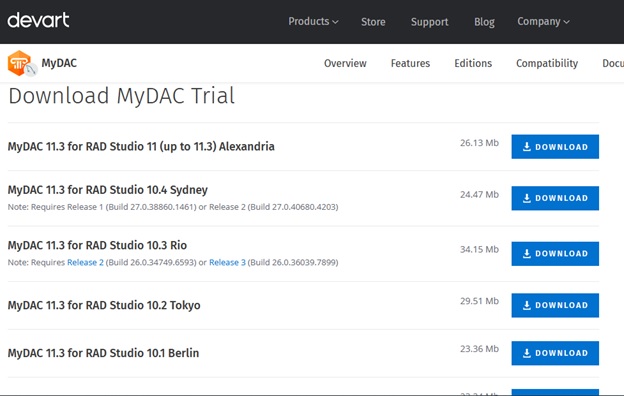
Downloading MyDAC
- Visit the Download Page: Navigate to the official Devart website or the specific page where MyDAC is available for download.
- Select the Latest Version: On the download page, you’ll find various versions of MyDAC. Choose the latest one that suits your needs.
- Download: Click on the download link to start downloading the installer package.
Installation Process
- Run the Installer: Once the download is complete, locate the installer package and run it to initiate the installation process.
- Follow the Prompts: The installation wizard will guide you through the setup. Follow the on-screen instructions to complete the installation.
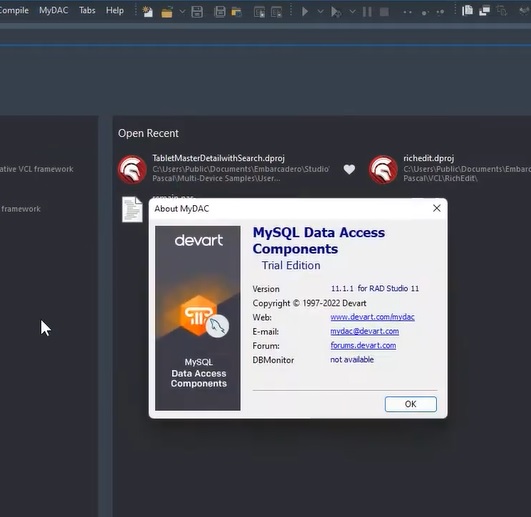
- Choose Edition: During installation, you’ll be prompted to select the edition you want to install. If you’re using it for evaluation purposes, you may opt for the trial edition.
Compatibility with IDEs
- RAD Studio 11 Alexandria: One of the standout features of MyDAC is its broad compatibility with various IDEs. Notably, it supports the latest RAD Studio 11 Alexandria, making it a flexible choice for developers.
- Other IDEs: Besides RAD Studio, MyDAC is also compatible with older versions of Delphi and C++ Builder, offering a wide range of options for different development environments.
After successfully completing the installation, you should see a new MyDAC menu in your IDE, confirming that the component set is now ready for use.
By following these steps, you’ll have MyDAC installed and ready, setting the stage for seamless MySQL connectivity in your Delphi applications.
MyDAC Components Overview
Once MyDAC is installed, you’ll notice a new set of database components for Delphi, specifically designed to facilitate MySQL connectivity. These components are the building blocks that will enable you to create robust and efficient database applications.
Available Components
- TMyConnection: This component is essential for establishing a connection between your Delphi application and the MySQL database.
- TMyQuery: This component allows you to execute SQL queries and manipulate data within the database.
- Additional Components: MyDAC also offers a variety of other components designed to handle different aspects of database interaction, such as transactions and stored procedures.
Workflow-Simplifying Features
- HTTP Tunneling: One of the standout features of MyDAC is its support for HTTP tunneling. This allows your application to connect to MySQL databases that are behind firewalls, thereby expanding the range of applications you can develop.
- Fault-Tolerated Loading: MyDAC also offers fault-tolerated loading capabilities, which means that your application can recover gracefully from temporary network glitches or database downtimes, ensuring a smooth user experience.
By leveraging these components and features, you can significantly streamline your development workflow. The MyDAC components not only make it easier to connect to MySQL databases but also offer advanced features that can simplify complex tasks and enhance the robustness of your applications.
Working with dbForge Studio for MySQL
When it comes to database management, dbForge Studio for MySQL offers a comprehensive suite of tools that can complement your Delphi application development. One of the most fundamental tasks you’ll perform is creating and viewing tables in the database. Here’s how this integrates with your Delphi application:
Creating and Viewing Tables
- Launch dbForge Studio: Open the dbForge Studio for MySQL application and connect to your MySQL database.
- Navigate to Tables: In the left-hand navigation pane, click on the “Tables” section to view existing tables or create new ones.
- Create New Table: To create a new table, right-click within the “Tables” section and choose “Create New Table.” Follow the prompts to define the table schema, including fields, data types, and constraints.
- View Existing Tables: To view an existing table, simply double-click on the table name in the “Tables” section. This will open a new tab where you can view the table schema and data.
Integration with Delphi Application
- Data Consistency: The tables you create or modify in dbForge Studio will be the same tables your Delphi application interacts with via MyDAC components. This ensures data consistency across both platforms.
- SQL Queries: The SQL queries you test in dbForge Studio can be directly implemented in your Delphi application using the TMyQuery component. This makes it easier to debug and optimize your queries.
- Data Manipulation: Any data manipulation tasks, such as inserting, updating, or deleting records, can be performed in both dbForge Studio and your Delphi application, offering a seamless workflow.
By understanding how to create and manage tables in dbForge Studio for MySQL, and knowing how this integrates with your Delphi application, you can create a more efficient and streamlined development process.
Implementing TMyQuery
The TMyQuery component is a cornerstone of your Delphi application when it comes to executing SQL queries and manipulating data within your MySQL database. This section will guide you through the steps to add this component to your project and utilize it effectively.
Adding the TMyQuery Component
- Access Delphi Palette: Open your Delphi project and navigate to the component palette, usually located on the right-hand side of the IDE.
- Locate MyDAC Components: Scroll through the palette until you find the section dedicated to MyDAC components.
- Add TMyQuery: Locate the TMyQuery component and drag it onto your form, or simply double-click it to add it to your project.
Writing SQL Queries and Fetching Data
- Select TMyQuery: Click on the TMyQuery component you just added to your form to select it.
- Configure Connection: Make sure the TMyQuery component is linked to your TMyConnection component, ensuring it knows which database to interact with.
- Open SQL Property: In the Object Inspector, locate the SQL property and click on it to open the SQL editor.
- Write SQL Query: In the SQL editor, write the SQL query you wish to execute. For example, you could write a SELECT statement to fetch data from a specific table.
- Execute Query: To execute the query and fetch data, you can either set the Active property of TMyQuery to True or use methods like Open or ExecSQL, depending on the type of query.
By following these steps, you’ll be able to add the TMyQuery component to your Delphi application and use it to execute SQL queries and fetch data from your MySQL database. This component is integral for any data-driven application and offers a straightforward way to interact with your database.
Live Bindings and UI
Creating a responsive and intuitive user interface is crucial for any application, and Delphi’s live bindings feature offers a seamless way to connect your data to UI components. In this section, we’ll explore how to use live bindings in conjunction with the TListView component to display data fetched from your MySQL database.
Utilizing Live Bindings
- Open LiveBindings Designer: Within your Delphi IDE, navigate to View > Tool Windows > LiveBindings Designer to open the LiveBindings Designer window.
- Connect Components: Drag a line from your TMyQuery component to the UI component where you want to display the data. This establishes a live binding between the data source and the UI.
- Configure Properties: After connecting the components, you’ll need to configure the binding properties to specify how the data should be displayed. This can usually be done within the Object Inspector.
Choice of TListView for Displaying Data
- Cross-Platform Compatibility: One of the main reasons for choosing TListView is its compatibility with multiple platforms. Since Delphi allows for cross-platform development, using TListView ensures that your application will function consistently across different operating systems.
- Data Presentation: TListView offers a flexible way to present data, allowing for various item appearances and layouts. This makes it a versatile choice for displaying complex data structures.
- Performance: TListView is optimized for performance, ensuring that even large datasets can be displayed efficiently. This aligns well with the high-performance capabilities of MyDAC components.
By leveraging live bindings and the TListView component, you can create a dynamic and responsive UI that not only displays data effectively but also ensures cross-platform compatibility and performance. This combination offers a robust solution for any data-driven Delphi application.
MyDAC’s Versatility
MyDAC’s capabilities extend far beyond basic database connectivity, offering a range of features that make it a versatile choice for various types of applications. In this section, we’ll delve into some of these features that underscore MyDAC’s adaptability and broad applicability.
Support for Cloud-Based MySQL Services
- Seamless Integration: MyDAC is designed to work effortlessly with cloud-based MySQL services. Whether you’re using AWS, Azure, or any other cloud provider, MyDAC ensures a seamless integration process.
- Scalability: The cloud support also brings in the advantage of scalability. As your application grows, MyDAC can easily adapt to changing database needs without requiring significant changes to your existing code.
Suitability for Multiple Platforms
- Desktop Applications: MyDAC is a robust choice for desktop applications, offering a range of features that facilitate complex data operations, transaction handling, and more.
- Mobile Applications: What sets MyDAC apart is its suitability for mobile applications as well. It allows your mobile apps to interact with MySQL databases just as efficiently as desktop applications, providing a consistent experience across platforms.
By offering support for cloud-based services and being adaptable to both desktop and mobile environments, MyDAC stands out as a versatile database connectivity solution. Its wide range of features and adaptability make it an excellent choice for developers looking to build robust, scalable, and cross-platform applications.
Conclusion
We’ve navigated the essential steps for integrating MySQL databases into Delphi applications using MyDAC. From the initial installation of MyDAC to leveraging its specialized components like TMyQuery, each step serves a critical role in simplifying your development process. These steps are vital for creating robust, data-driven applications that can run efficiently on both desktop and mobile platforms. For those looking to expand their knowledge further, the official Devart documentation is an invaluable resource, offering in-depth insights into MyDAC’s advanced features. By following this guide, you’re well-positioned to build versatile, scalable applications that can even adapt to cloud-based environments. Thank you for reading, and best of luck in your development journey.